Upgrading my Autoguider Camera

As we progressed through another galaxy season, I was constantly fighting to find a guide star that keeps my target framed.  With my remote controlled off-axis guider (OAG) setup, if I can’t find a good star in the guide camera field of view (FOV) when the target is centered, my only option to shift the entire image position looking for a star, since I can’t rotate or otherwise move the guide camera relative to the target FOV.  Thus I started thinking about upgrading from my QHY5L-II M to a new guide camera, ideally with both a larger FOV and higher sensitivity.  Looking at the new crop of guide cameras, this led me to looking at cameras based on the Sony Starvis (star visibility) IMX178 sensor.  Comparing with the MT9M034 sensor in the QHY5L-II, the IMX178 sensor has just over twice the total area (7.4 x 5 mm vs. 4.8 x 3.6 mm or 2.09x), but with 5x the pixel count.  In addition to improving my guiding, another advantage to this 6.3 MP camera is that it would be a reasonable entry-level imager for narrow band imaging (e.g. H-alpha solar imaging, etc.).

After some online discussions with others on Cloudy Nights and elsewhere, but otherwise very little feedback on the best choice for my application, I ended up putting together a comparison table between the monochrome sensors currently being targeted for guide cameras.  The following table is in order of increasing price.  The IMX290 sensor has the best sensitivity in the new Starvis line, but with the 1080P 16×9 form factor, it suffers the same limitations I discovered when I tried using the ZWO ASI290MC for my all sky camera.  It basically has the same area as the QHY5L-II, but with a less practical form factor (16×9 vs 4×3), so while I’d expect the sensitivity to help considerably, it wouldn’t increase the usable FOV.  On the other hand, the IMX174 is a much bigger sensor, which presumably explains why cameras based on it are considerably more expensive, but it’s also based on older technology and has a much lower resolution.  By simple virtue of the large pixel size, it can be expected to be more sensitive than the QHY5L-II, but the potential loss in guider resolution, not to mention the much higher cost, make this an impractical solution.

MT9M034 IMX290 IMX178 IMX174
Size (mm) 4.8 x 3.6 5.61 x 3.18 7.37 x 4.92  11.34 x 7.13
Relative Area 1x 1.03x 2.1x  4.7x
Pixel Size (μm) 3.75  2.9 2.4 5.86
Relative Pixel Area 1x  0.60x 0.41x 2.44x
Pixel Count (WxH) 1920 x 960  1936 x 1096 3072 x 2048 1936 x 1216
Total Pixels (MegaPixels) 1.2  2.1  6.3 2.4
Relative Pixel Count 1x 1.7x 5.1x 1.9x

That really just leaves the original IMX178 I started looking at, which also happens to be the color sensor in the ZWO ASI178MC I finally integrated into my all sky camera.  That just took me back to the original choice I was trying to decide between which camera vendor to use, QHY or ZWO.  My imaging camera and previous guider are QHY, but I tried ZWO for the all sky camera, partly due to a better overall price point.  However, the other factor here was the camera form factor.  While both QHY and ZWO make cameras in the mini guide camera form factor, for this particular sensor, only QHY made a mini similar to the QHY5L-II I was replacing.  For ZWO I’d have had to go with the same form factor as the all sky camera.  While that’s essentially the same form factor as the StarShoot AG I’d been using before the QHY5L-II, I had reason to want to stay with the mini form factor, for weight if nothing else.  Thus, even though it was about 10% more expensive I chose to go with the QHY5LIII178M over the ZWO ASI178MM.  Only after receiving my new camera did I finally get some feedback from someone that the QHY version has better fixed pattern noise due to some additional circuitry QHY adds!  Hopefully that justifies the added cost.
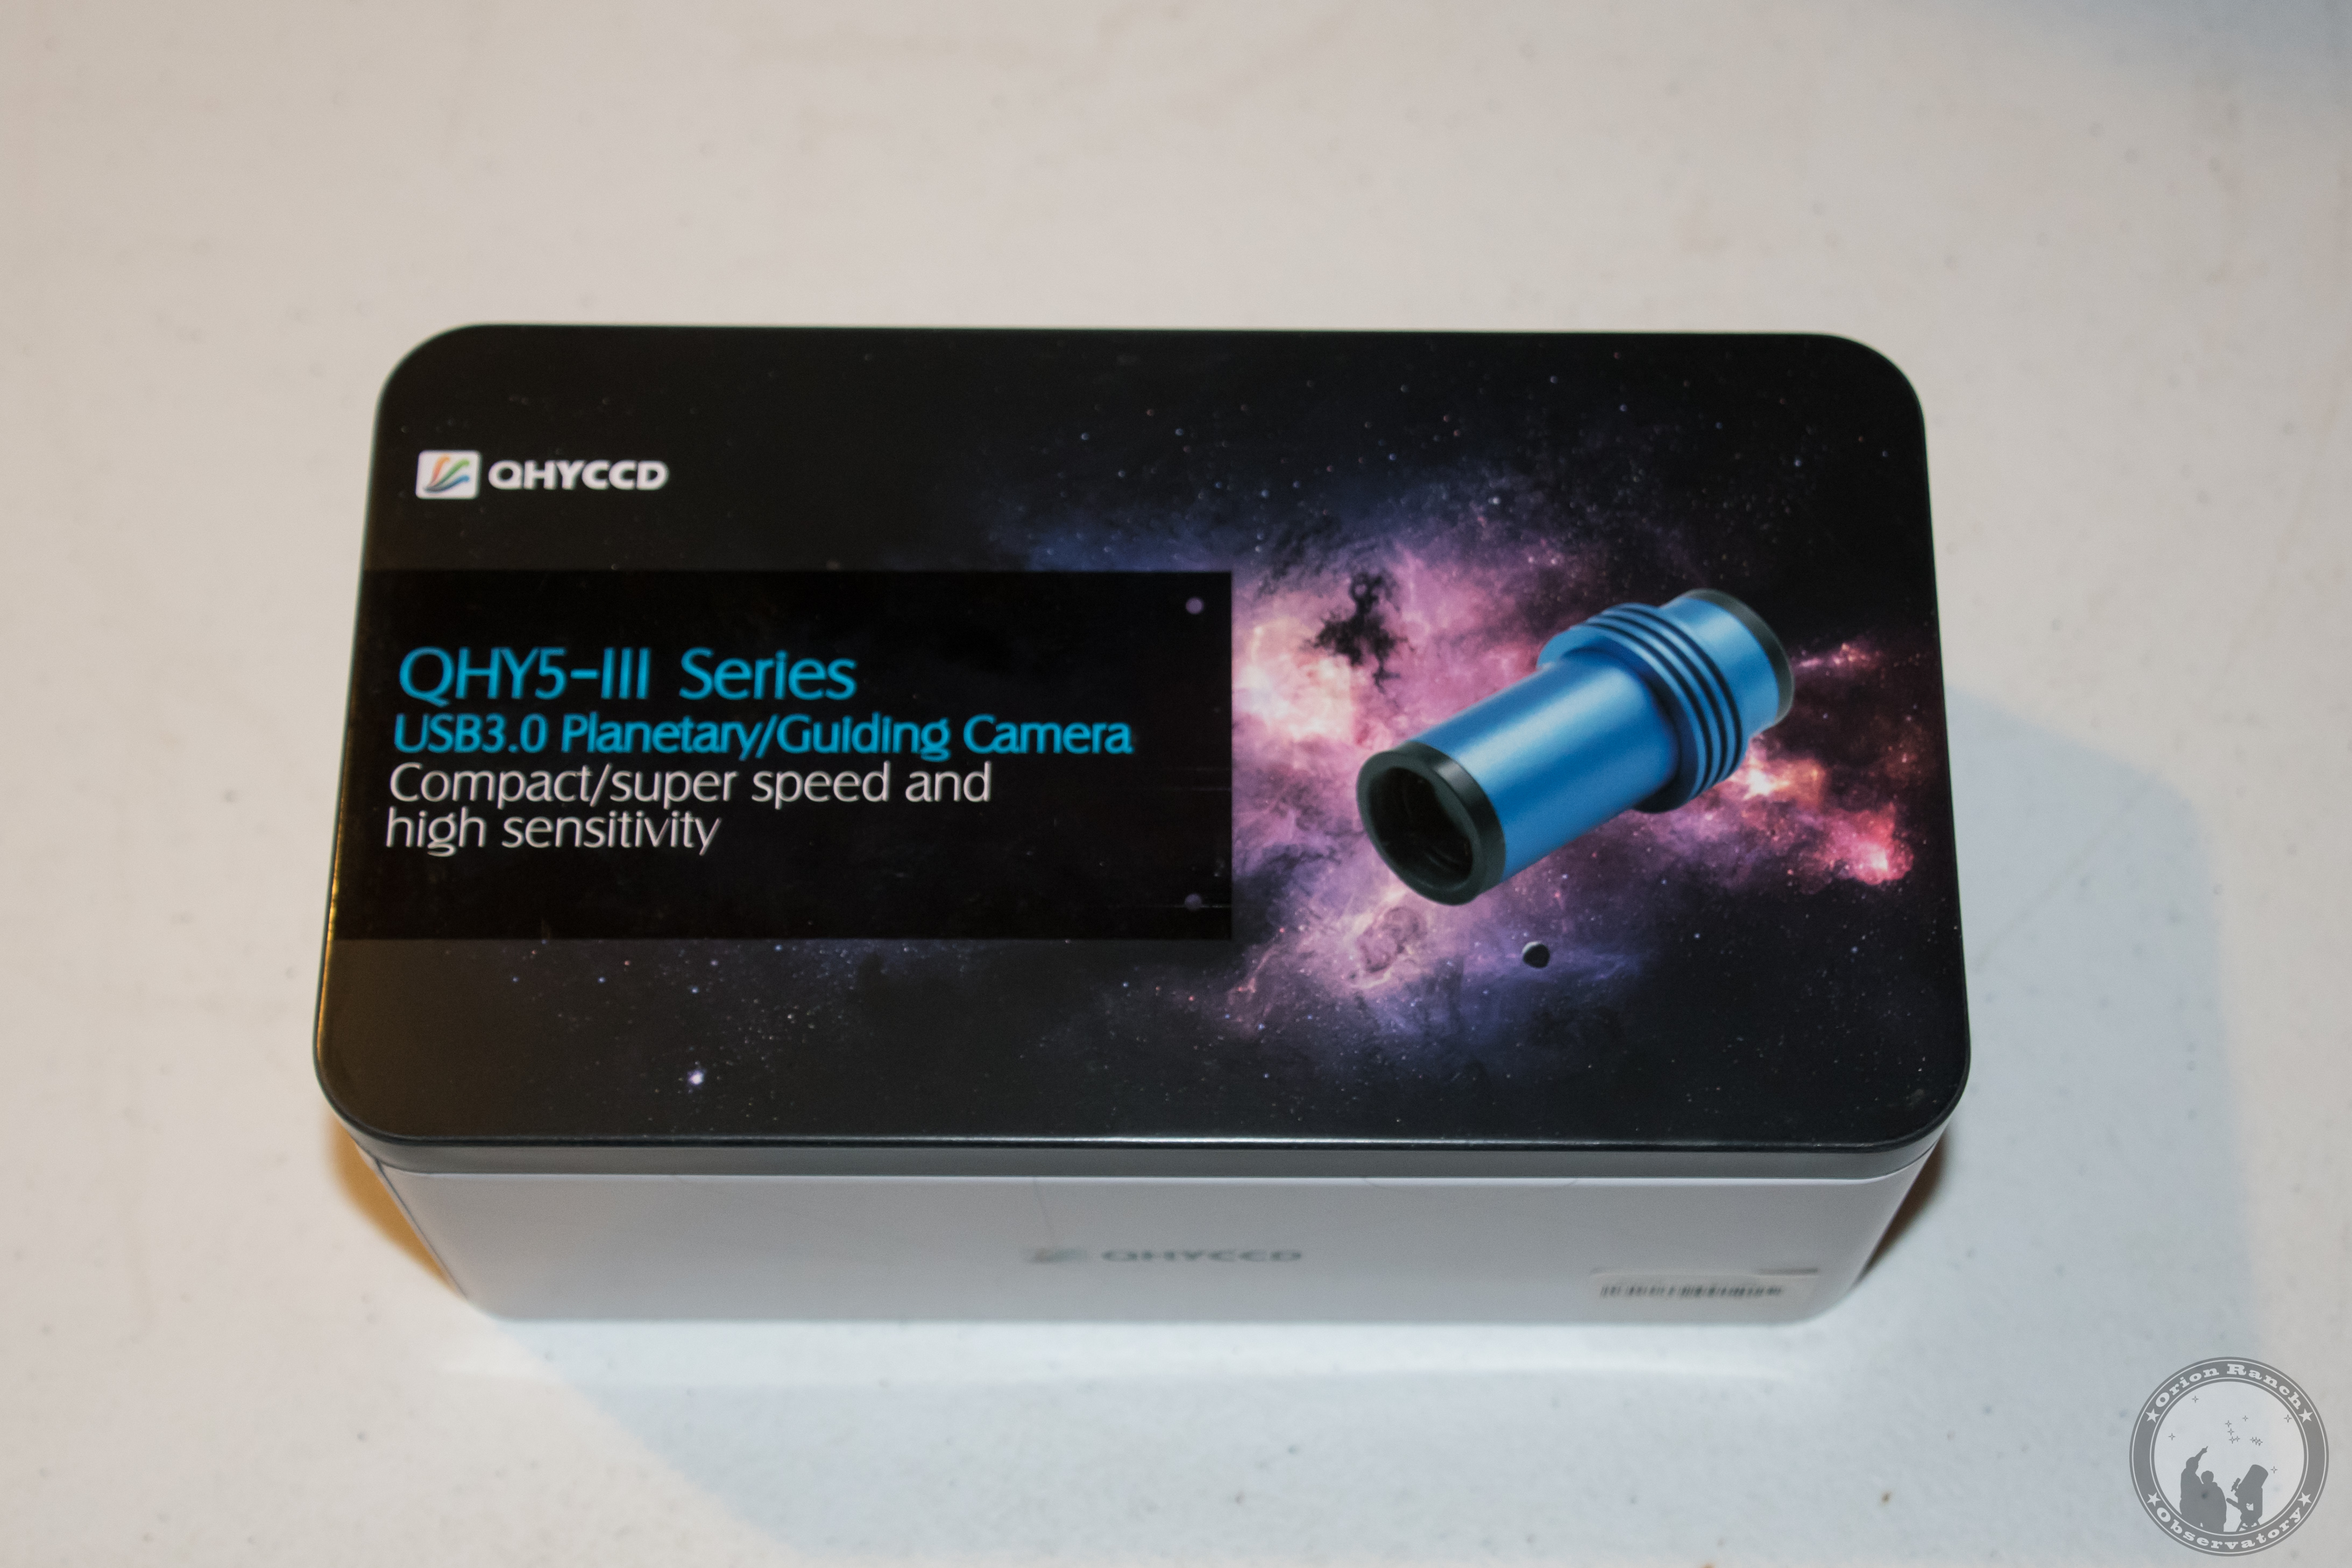
Unpacking

I ended up ordering from High Point Scientific simply because they had it in stock and OPT didn’t.  Both were running the same 5% NEAF discount on top of QHY’s NEAF sale.  High Point shipped it after one business day by USPS and it arrived two days later.   High Point was also asking customers to create unboxing videos, so this is the first time I’ve attempted to capture video footage in addition to photos of the process.

The camera arrived nicely packaged in a “collector can” similar to that for the QHY5L-II.

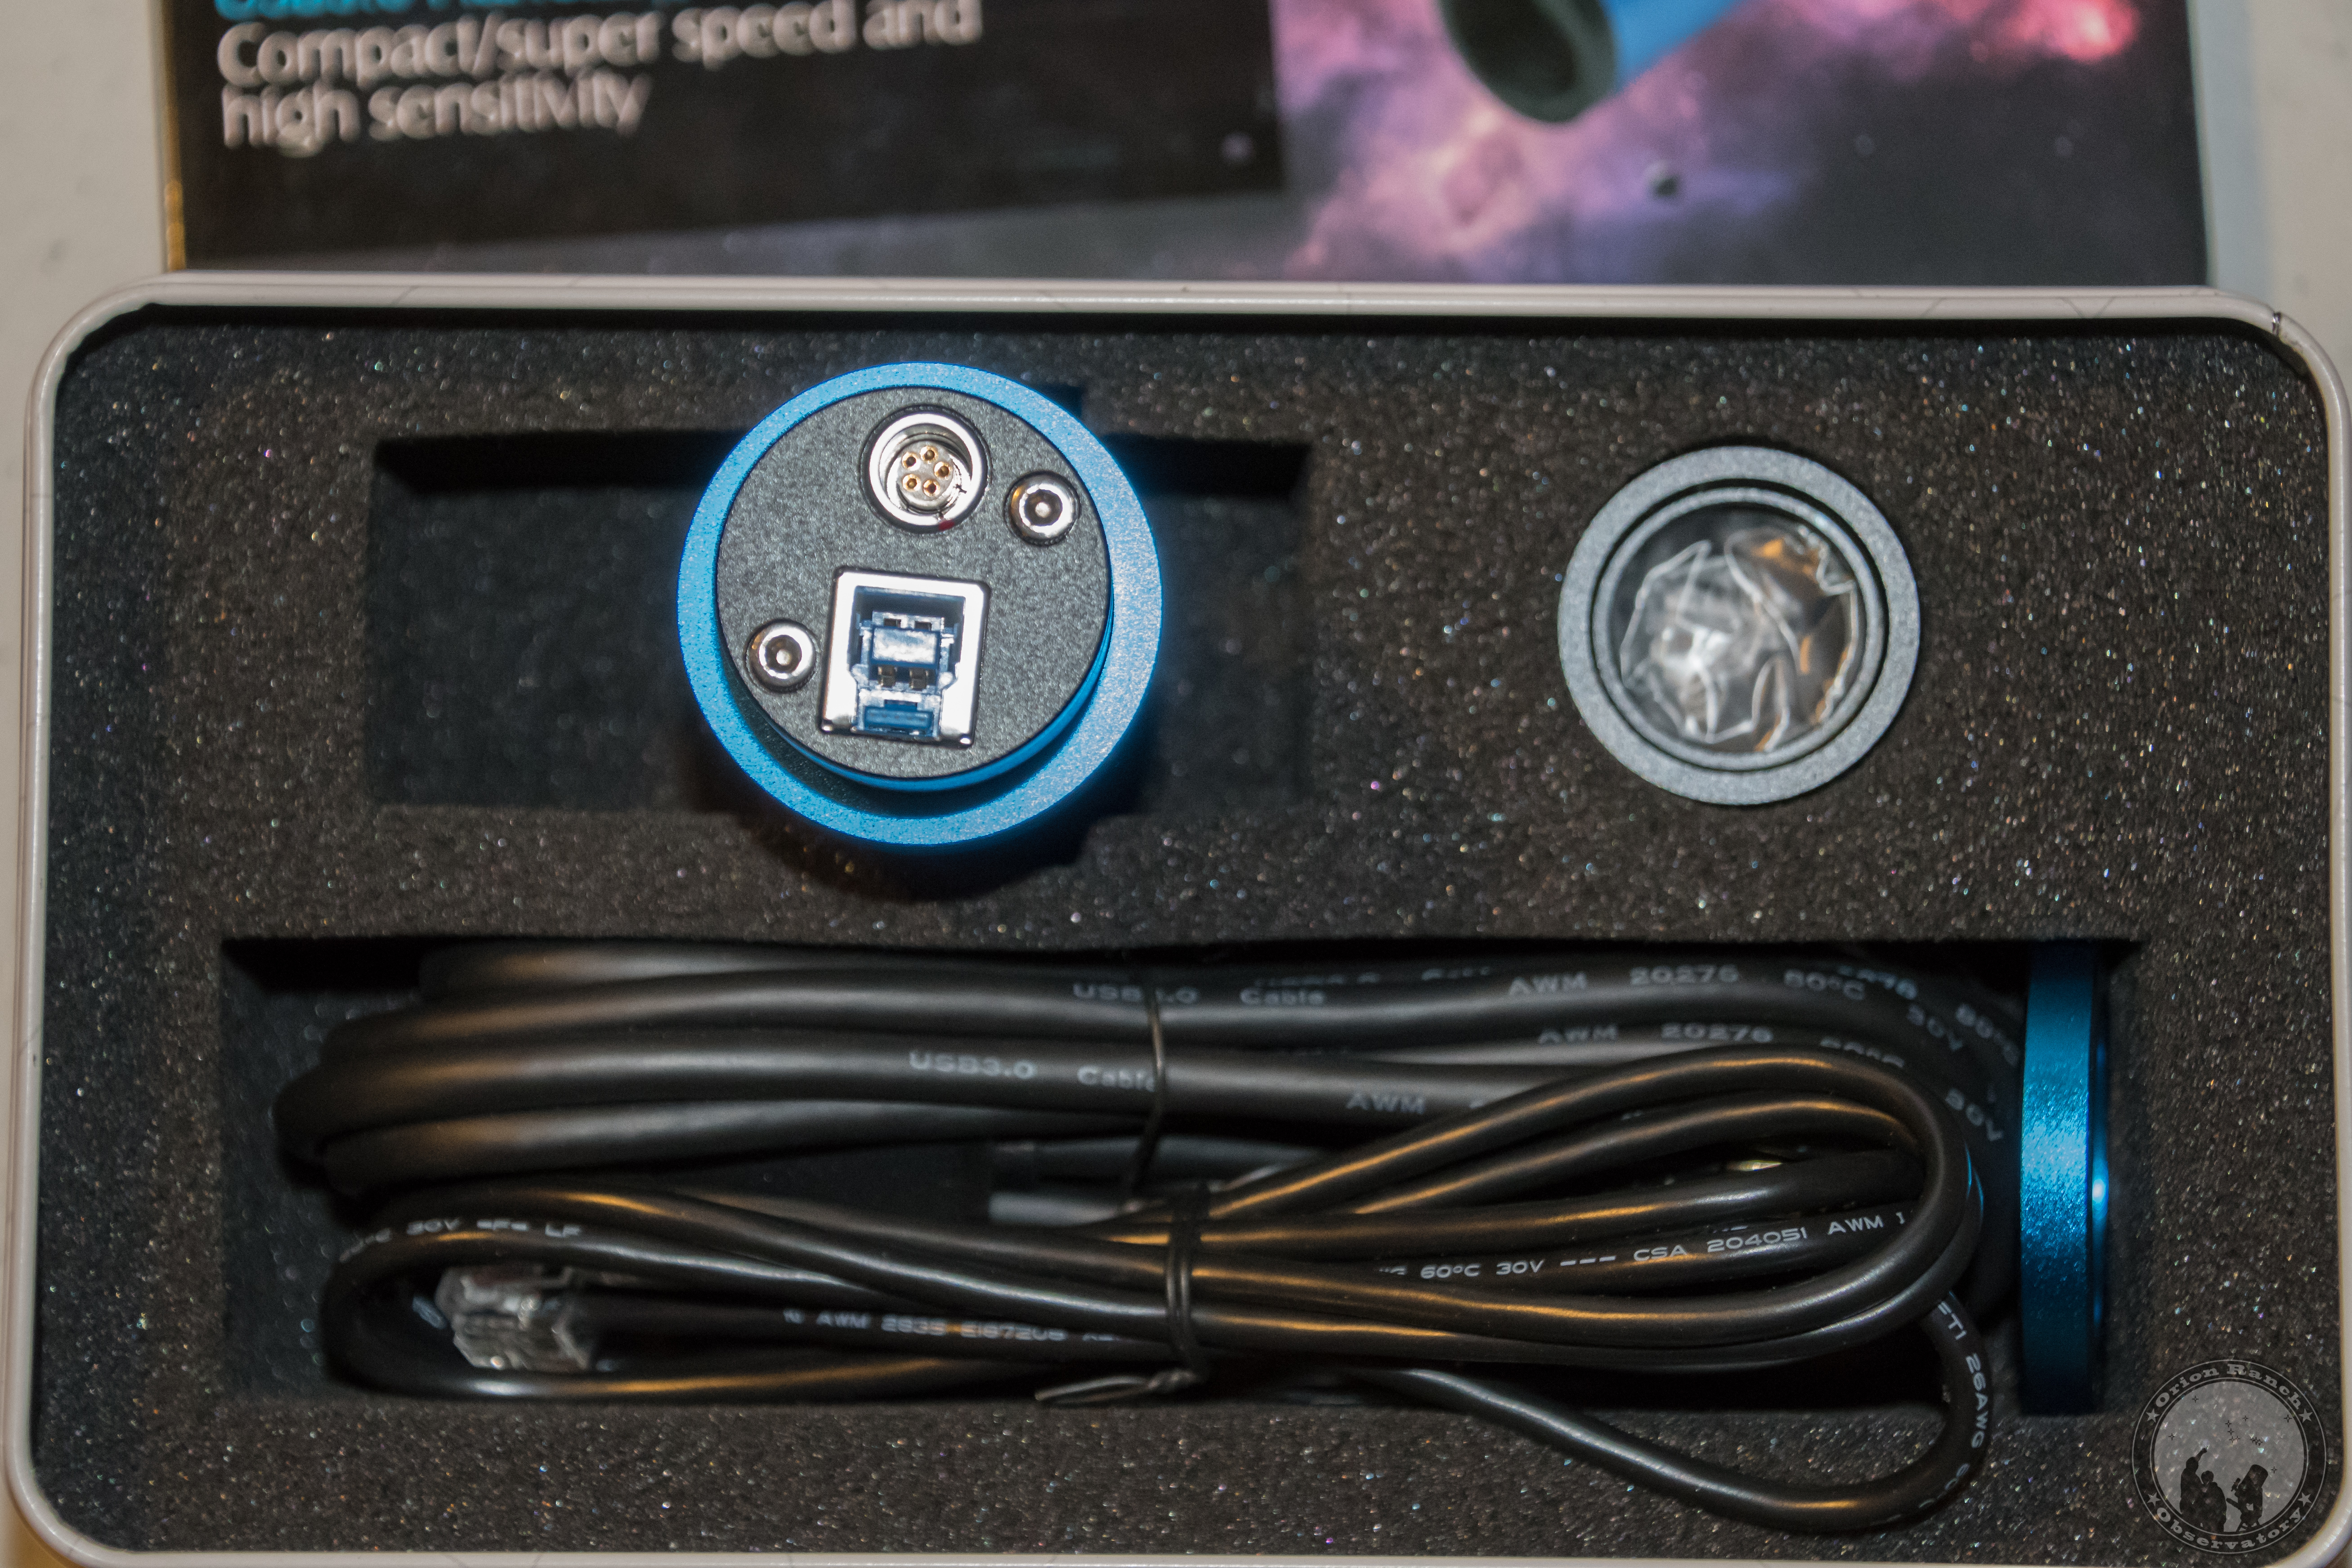
The camera is a nice pretty blue anodized package.

The connector end of the camera has a USB 3.0-B style connector and a non-standard LEMO connector for the guide port due to the limited space.  Given the compromise ZWO was making for this form factor by going to a micro USB 2.0 interface, I’d much rather have a USB-B connector than a USB 3.0 micro connector and a standard RJ-11 socket for the guide port.

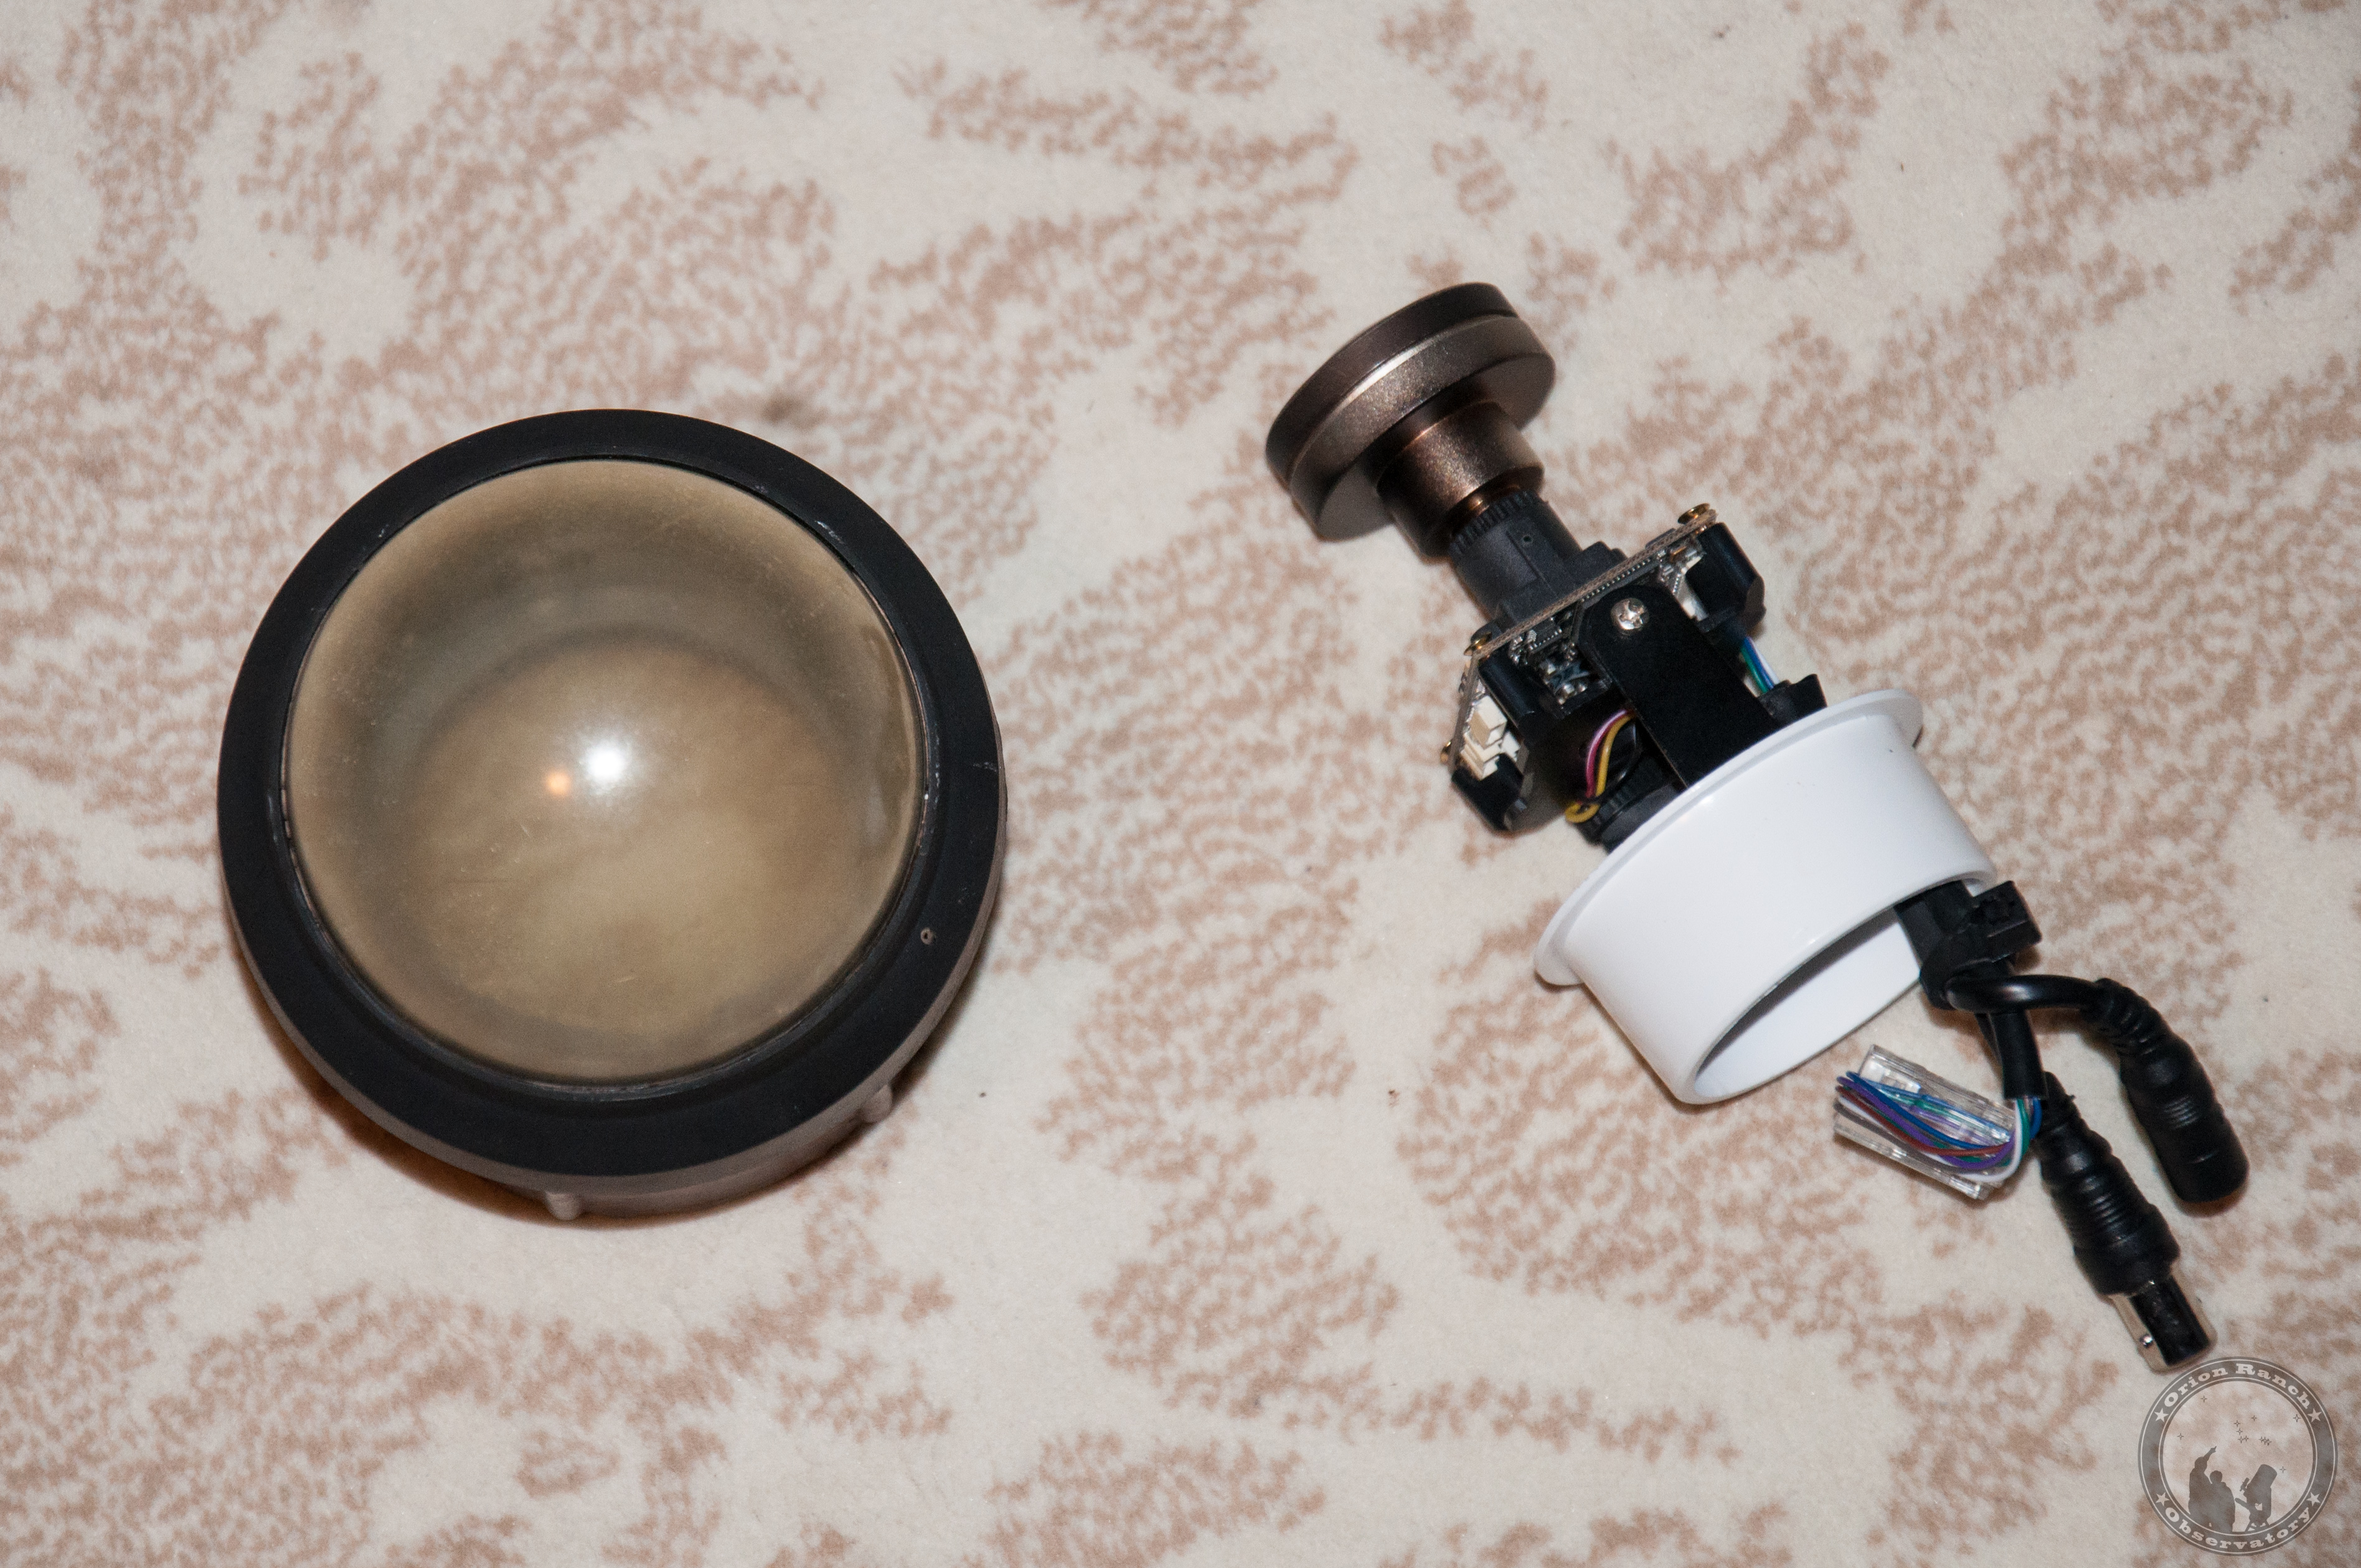
I didn’t get the best of focus, but here’s my attempt o compare the size of the two sensors.  You can see how much bigger the new IMX178 sensor is. The distance from the tube front appears the same, so adjusting the confocal ring on the new camera to the same distance from the front of the nosepiece had it almost perfectly focused when I put it into the OAG.

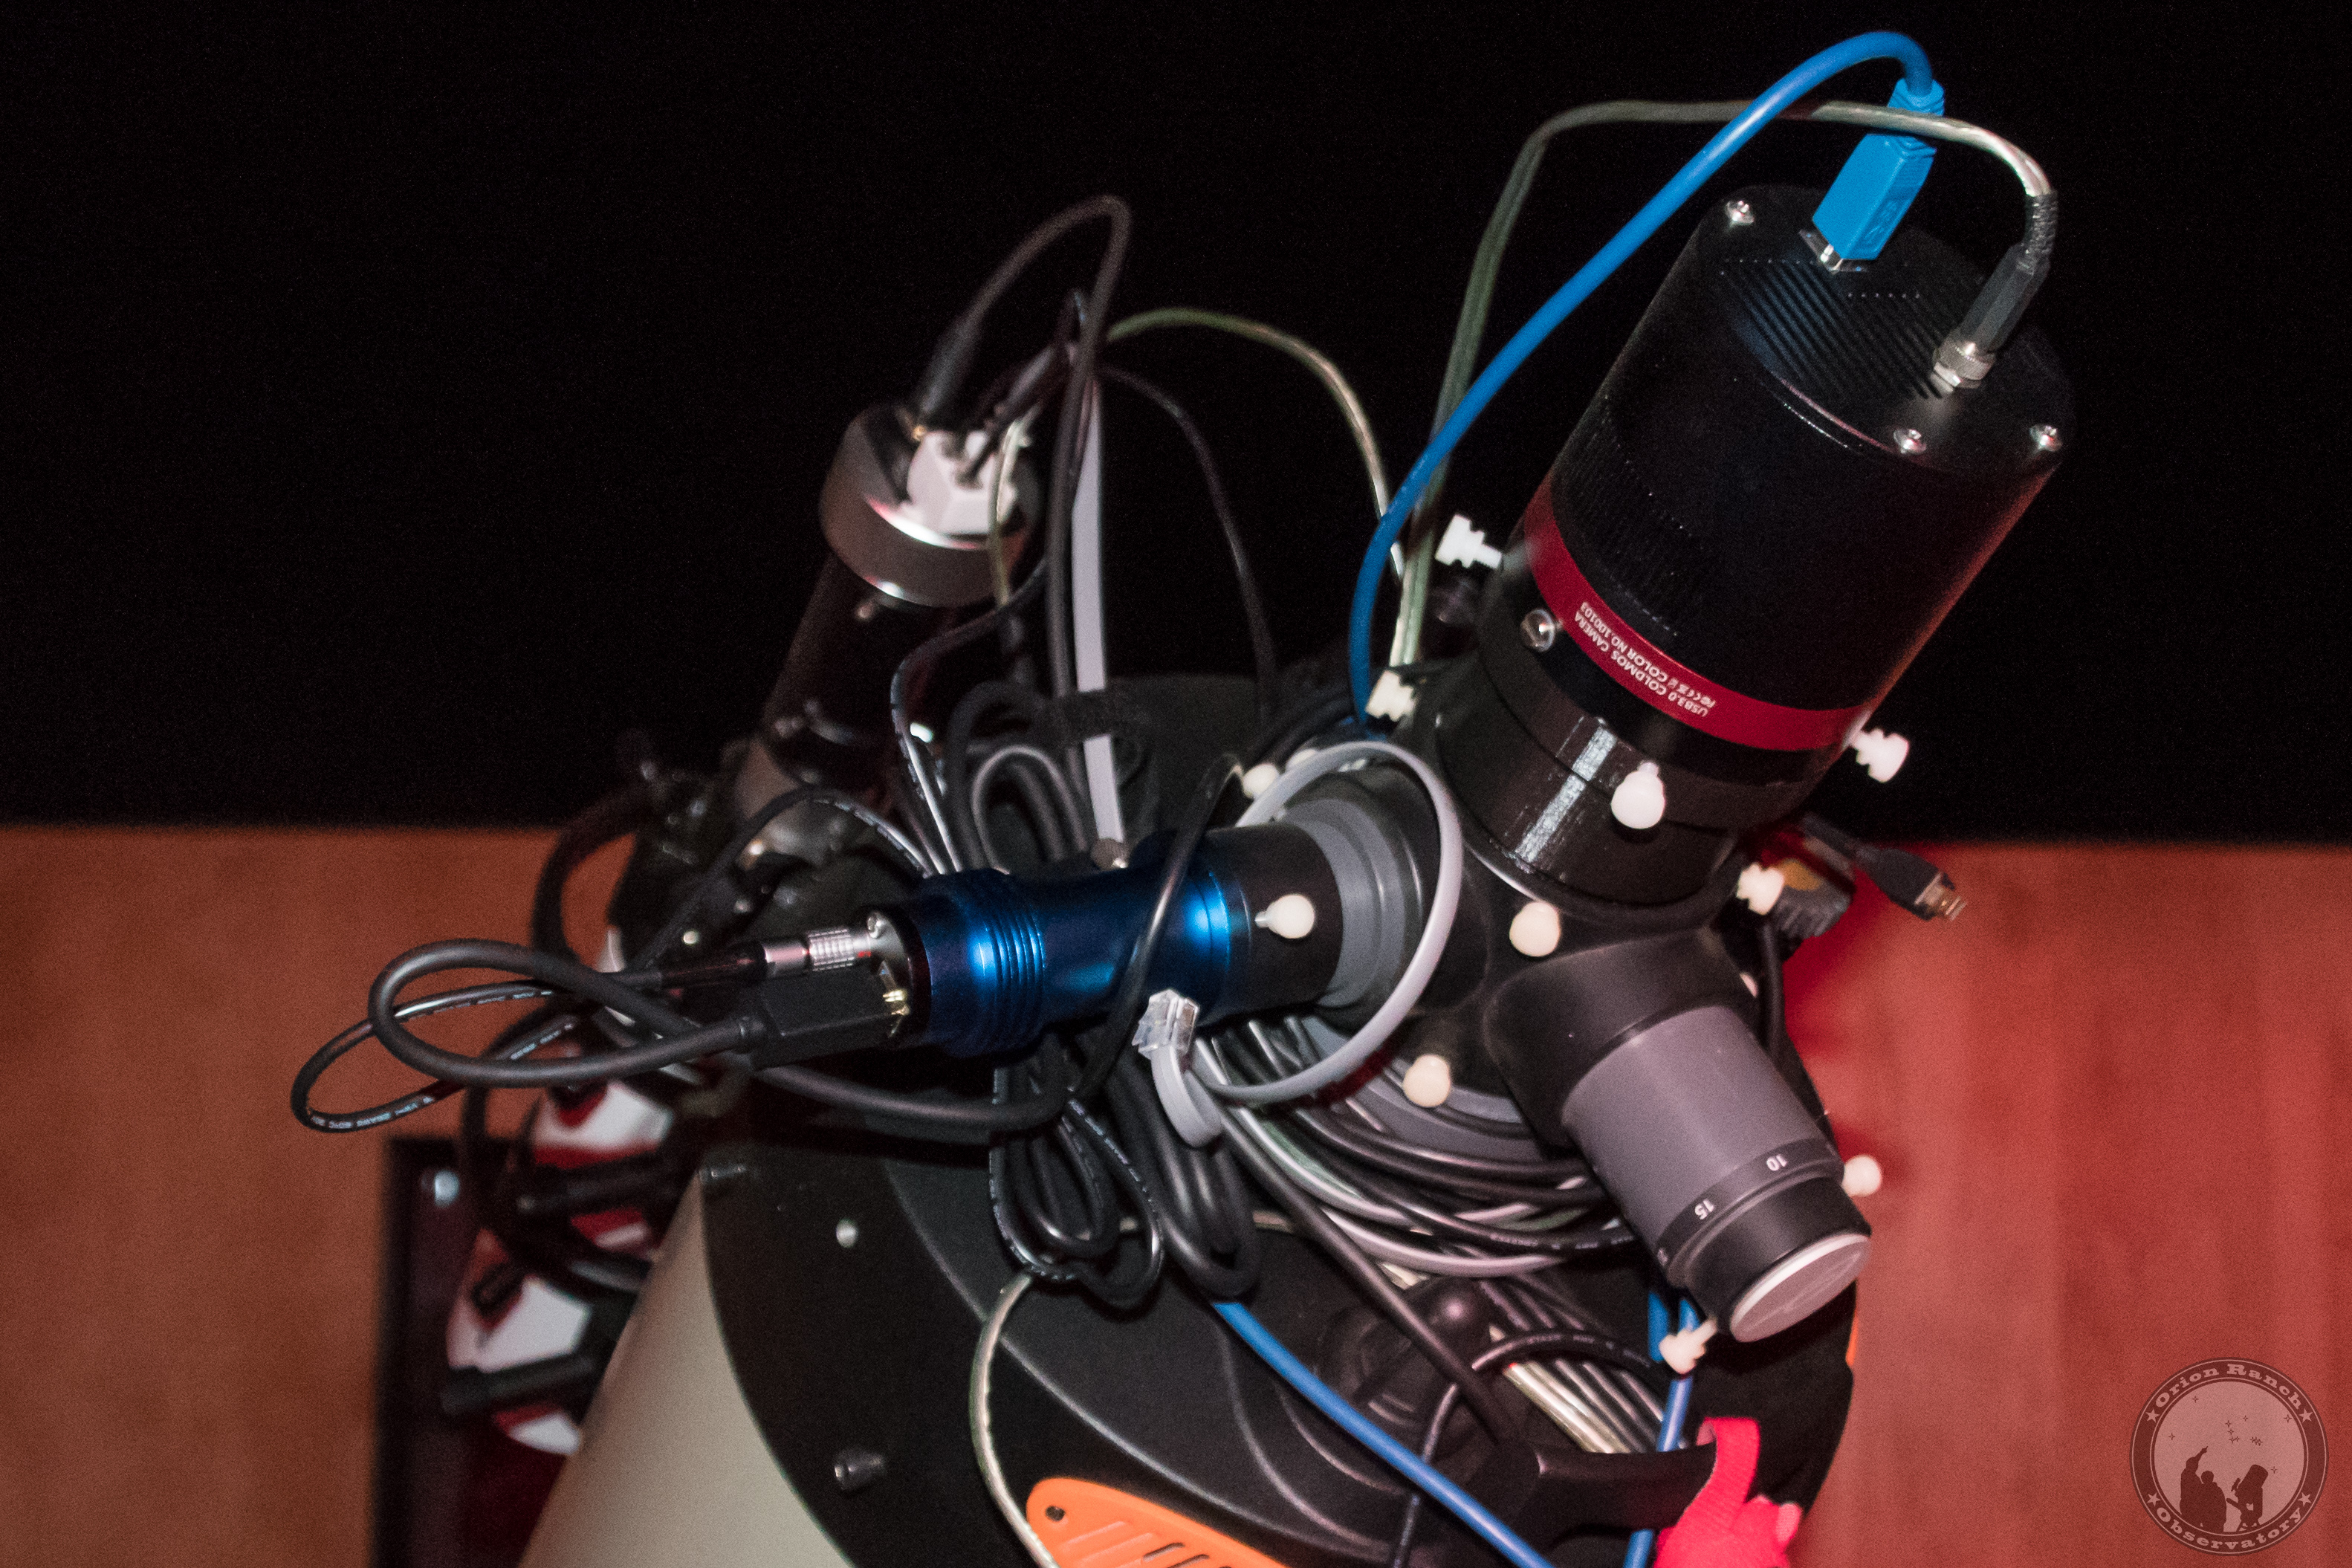
Here it is installed on the OAG.  I forgot to take the picture while I was using it, so this was after parking.  I definitely need to work on cleaning up my cables!


 Sensitivity and FOV Testing

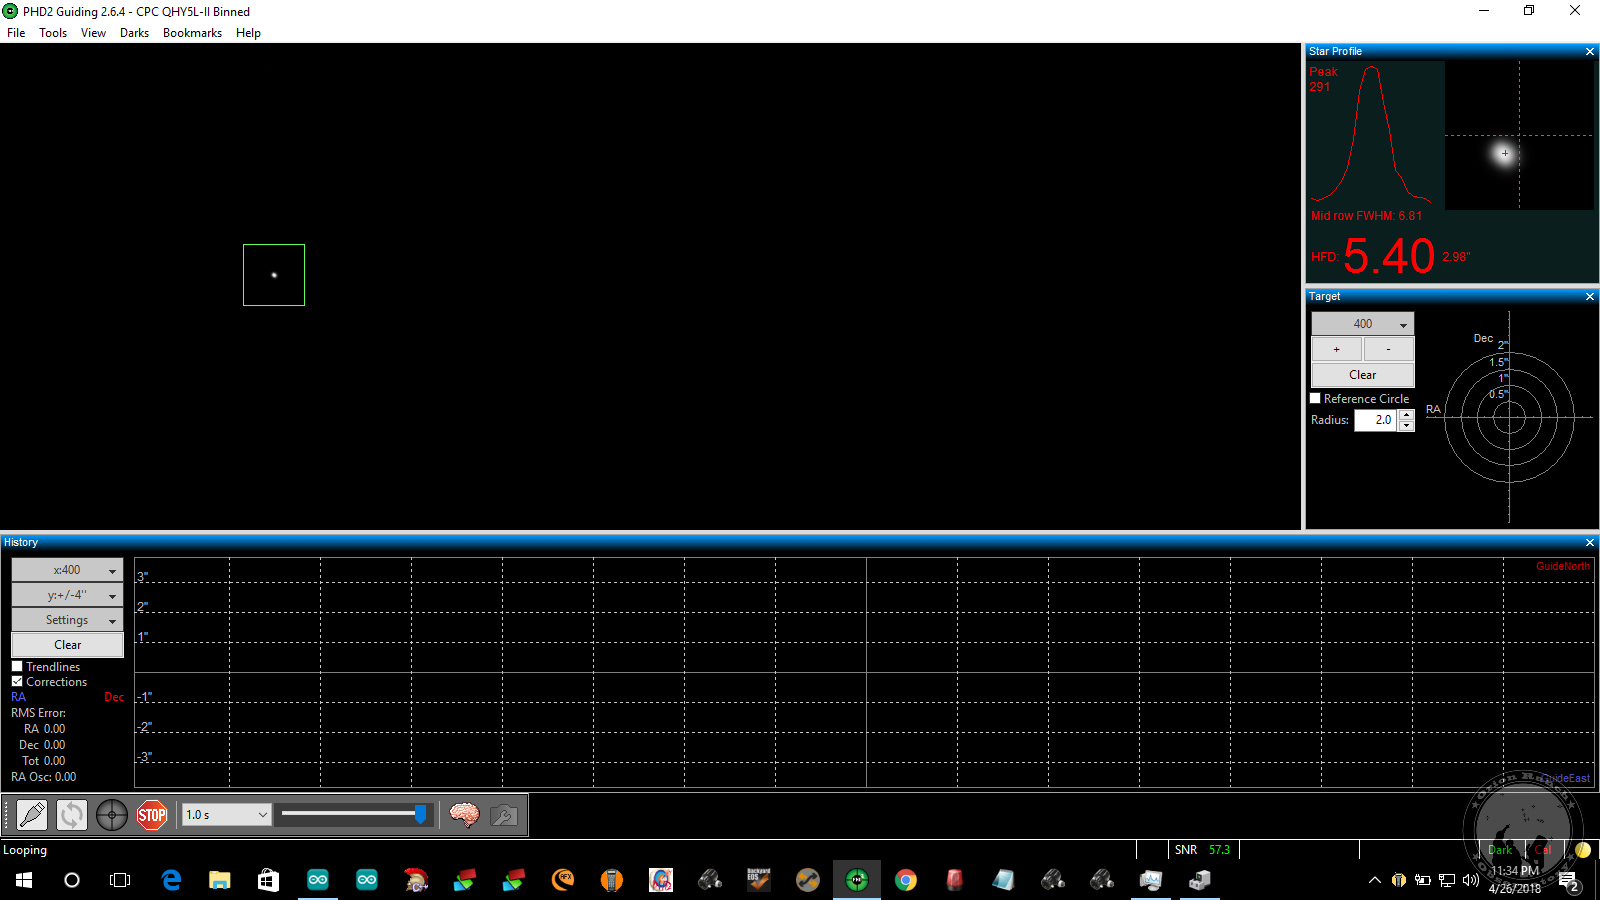
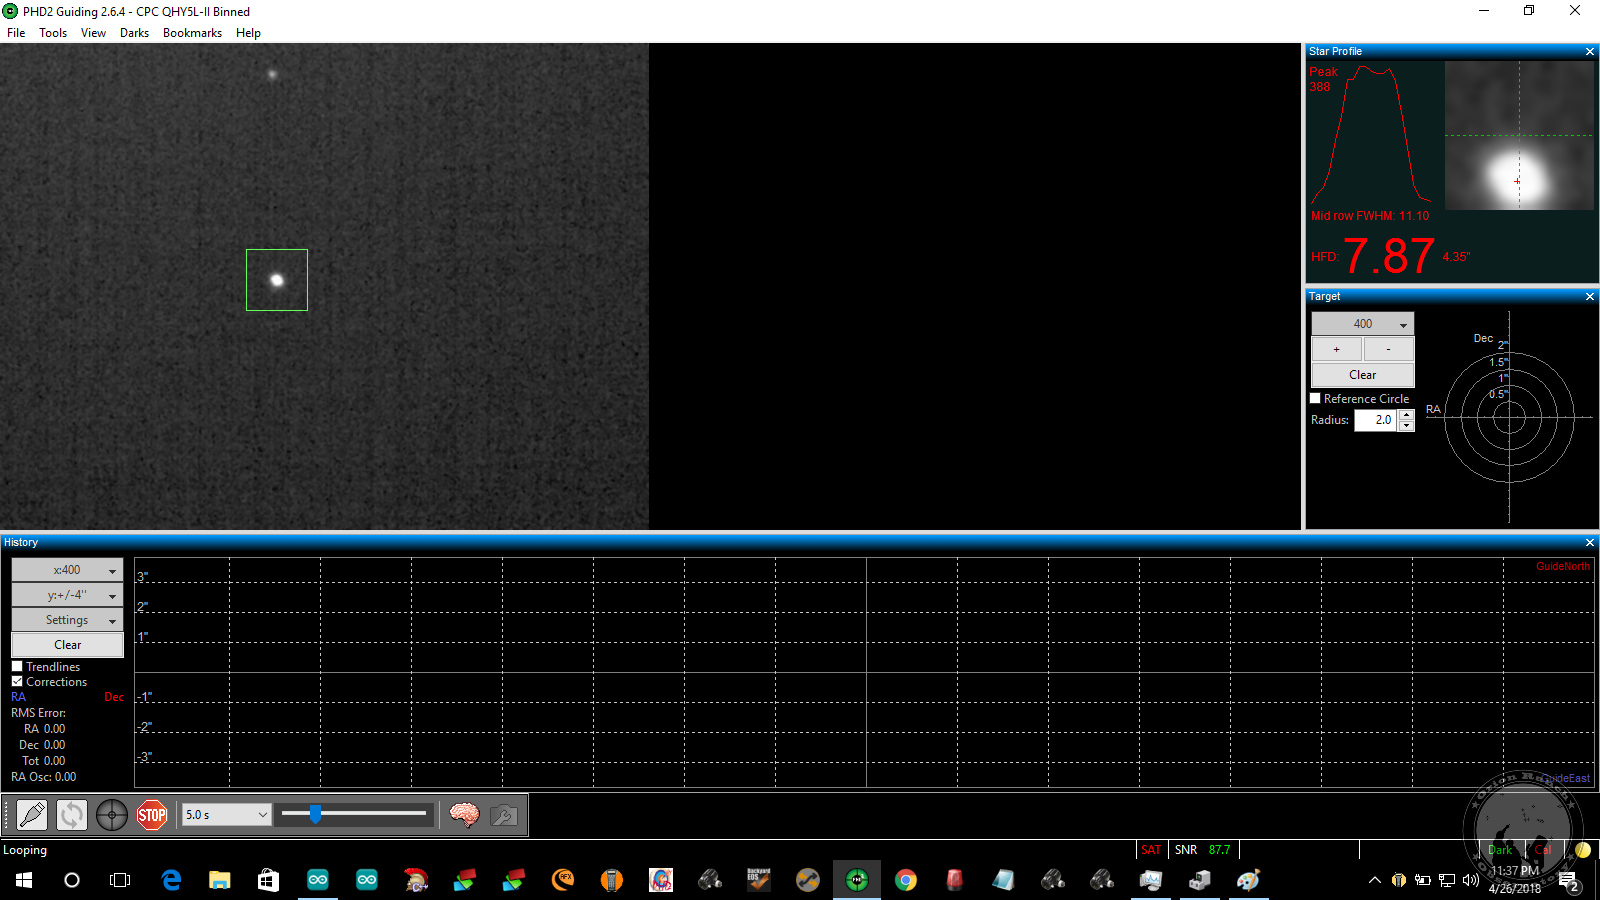
Before swapping cameras, I did a few tests to try to get an idea of the relative sensitivity of the two cameras.  With the exception of the IMX290 and IMX178, which are in the same Starvis series, there was precious little comparable sensitivity data for the sensors, so this was the first chance to find out if I really gained anything in sensor sensitivity.  I’d previously been imaging M81 and knew I had one good guide star visible there with the QHY5L-II.  At one second exposure, that single star is visible in the FOV.

At five seconds, a second star is visible if I adjust the gamma to pull it out of the background.

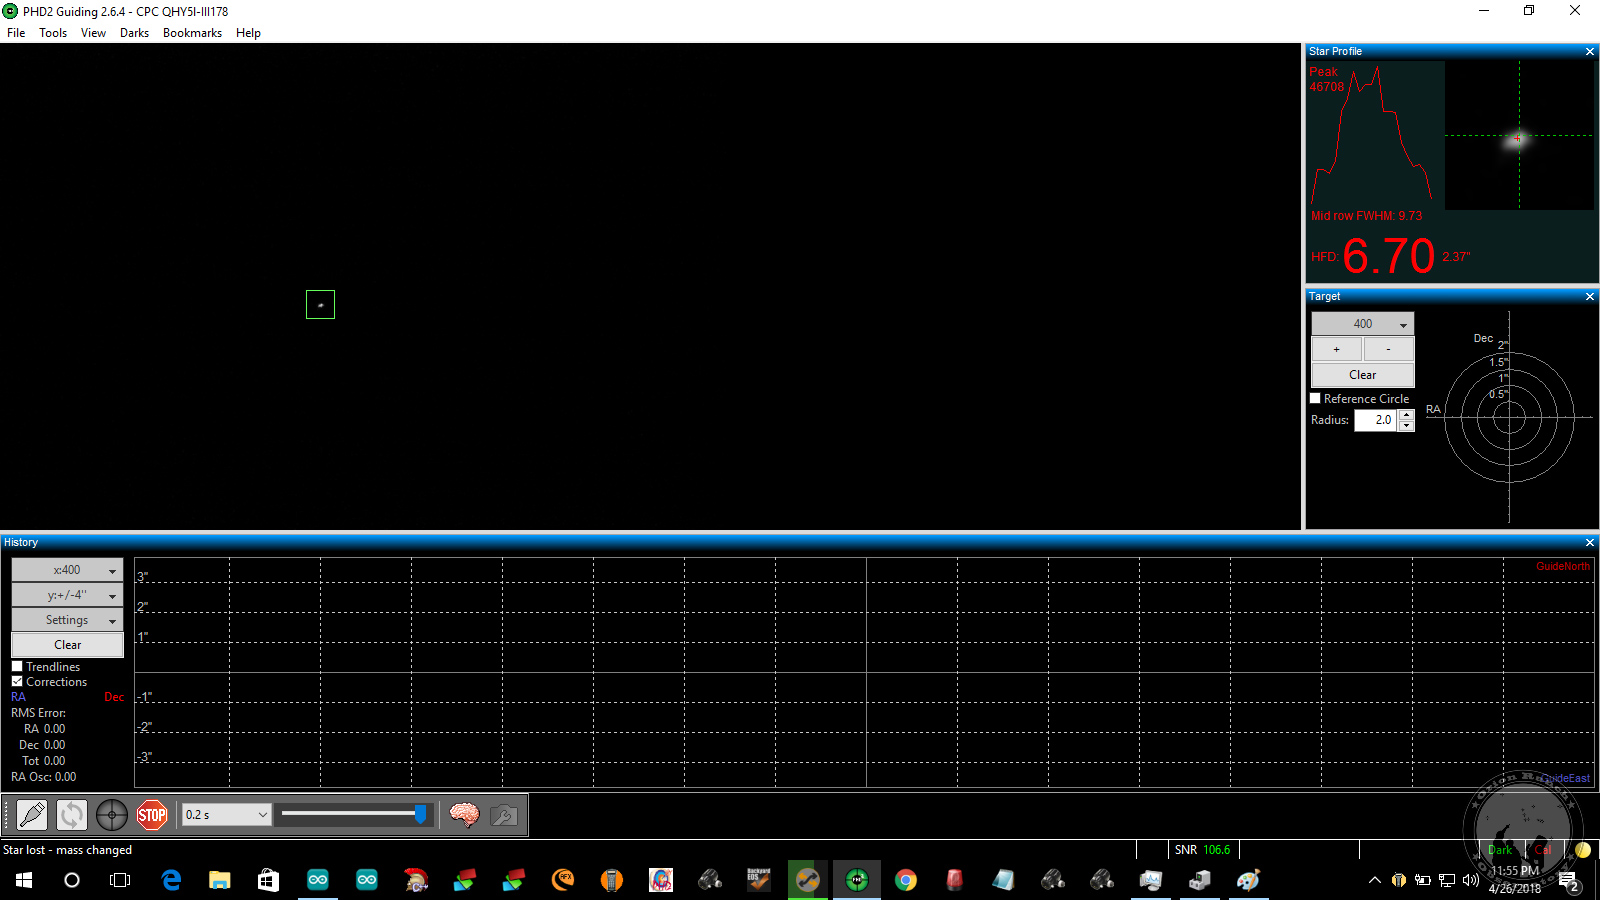
That’s really the limit of usable guide star exposure length, but doubling it to ten seconds didn’t change anything.  Swapping to the QHY5LIII178M, that first star is clearly visible at 0.2 second exposure.  The star profile is a bit noisy, but part of that is because the camera’s not perfectly focused at this point.  You can see how tiny the star is given PHD2 shows the entire FOV, so the scale here is smaller due to the much higher resolution.

At one second, the second star becomes visible.  This image also gives you an idea of how much larger the overall FOV has become.

At two seconds a third star becomes visible, although it’s easier to see in this four second exposure.

At this point there’s some background noise becoming visible and the image became unusable at a five second exposure.  In hindsight I believe this was due to having left the observatory monitoring cameras enabled so that their IR lights were creating a strong background lighting.  I may add some new test images to the gallery later, but the general observation is that despite the smaller pixel size, the QHY5LIII178M is at least five times more sensitive than the QHY5L-II.  From Sony’s documentation, the IMX290 is twice as sensitive as the IMX178, but at that point chances are good I would be sky glow limited in some cases!

Hopefully this will help anyone else researching a new autoguider camera.  For more information, you can check out these threads on Cloudy Nights and the PHD2 forum.

Posted in Uncategorized | Leave a comment

A Sad Day for TXMOST!

Today was a sad day for the Texas Museum of Science and Technology as the temporary location in Cedar Park closed its doors.  It would have been a great day had that been due to moving into a permanent facility, but given the absurdly high cost of the lease on the old indoor soccer building (that just had a dirt floor until six months or so ago) it was costing about $50k a month in donations just to keep the doors open.  Due to that and some lingering financial consequences of some of the initial exhibits like the incredibly expensive Body Worlds that they opened with, in January the museum Board of Directors chose not to renew their lease and instead focus their efforts and any incoming donations on their permanent location.

On Friday night we had our final star party to suitably gloomy weather, kicked off by a dinner and live music in the parking lot.  I’ve posted some pictures of the event including a last run through the museum to capture some artwork on the James Webb Space Telescope, and a rare picture of Mercury above Venus just over the corner of the museum building.

As far as the future of TXMOST, the goal is to continue looking for large corporate donors to support the building of a permanent location, and in the meantime possibly reopen on a smaller scale if a suitable location can be found.  There have been ongoing negotiations with the City of Cedar Park to provide the land for the permanent location, but without a suitable backing to build the building, the City has not been willing to officially commit the land.  So, if you’re here and reading this, certainly I’m sure TXMOST will appreciate anything you wish to donate, but you can also talk to your company HR and management to determine if your company has any sort of charitable outreach program that could get involved.  Many of us work for high tech companies who are reliant on finding employees with science, technology, engineering, and math backgrounds.  Certainly they should find value in helping to spark the interest in STEM in our next generations at an early age.  The future will thank you for it!

As far as the Friday night star parties, I am working on lining up a new location to be able to keep doing the star parties and keep up the awareness of TXMOST.  Watch here for more information on that.

Posted in Uncategorized | Leave a comment

New All-Sky Camera

My original NTSC all-sky camera had degraded to the point where it was useless.  The main problem was that the acrylic dome had weathered and aged to a fogged up brown color, but I also decided it was time for a high resolution digital solution that would give me a live online feed.  ZWO sells a number of planetary cameras that include a wide angle lens advertised for use as an all-sky camera.  Originally I was looking at the $169 ASI120MC, but decided to go for a bit more horsepower with the USB 3.0 ASI290MC.  At 1280×960, the ASI120MC is basically twice the ~640×480 of the NTSC camera (4x if you go by the total number of pixels), but the other big difference is the direct digital output vs. the analog video output being digitized by the security DVR.  The ASI290MC was on sale for $299 at the time and being USB3.0 sounded like a good idea for real-time recording.  It uses a 1936×1096 pixel sensor (basically a 1080P camera), that I thought had a wider field of view based on the published specs, but that ended up just being due to the 16:9 format chip being wider horizontally the 4:3 format, so the actual sky coverage vertically wasn’t very good.

The original NTSC Camera and Dome

More importantly, the USB 3.0 functionality was very poor, with the ASCOM driver hanging if you tried take images at less than once a second, and the DirectShow driver crashing constantly.  The poor USB 3.0 performance was frustrating since I’d invested in the only USB 3.0 capable stick PC to put in the camera, but moving down to USB 2.0 speeds meant that I could eliminate the computer in the camera housing and just go to a good USB 2.0 extender that worked over the CAT6 cable I have running to the camera location.  The DirectShow driver still crashed, but at least I could get something going with ASCOM.  However, given the total set of problems, including the poorly represented field of view, I decided to return the ASI290MC.  Unfortunately ZWO was still the only solution in this price range, so I ended up moving up to the $369 ASI178MC whose Y dimension of the sensor is about the same 5mm as the X dimension on the ASI290MC.  That meant that for a lens that hit the full field of view (FOV) only in the X direction on the ASI290MC, it would produce a full 360 degree FOV on the ASI178MC.  And at 3096×2080, the nearly 2x increase in vertical resolution was well worth the difference in price.  The camera still had the same driver problems as the ASI290MC, but at least it gave a better FOV with the default lens that came with it.

After some time and several posts on their forum, ZWO did eventually make a fix to the DirectShow driver opening up the option to use iSpy Connect software, which is an open source security camera monitoring software.  I’d need to make a few modifications to it to get some of the features I want, but the DirectShow driver has a built-in auto-exposure and automatic gain control loop that will track the broad change in brightness between day and night operation.  At the moment thought I’m concentrating on the ASCOM version of a software called AllSkEye, which while it also doesn’t do everything exactly as I’d like, is coming along nicely.  Being that it’s targeted specifically to running an all sky camera, the potential there is good and the developer Michael Poelzl has been quite responsive in making updates.

Currently the live view of the camera is available under the webcam link on the weather page.  At the moment that points straight to the latest image that is updated once a minute.  You just need to refresh the page to get a new image.  Eventually I intend to embed that in an HTML wrapper though, to be able to provide an image history, so that’s likely to change.  You can find the first light images for the ASI178MC in this gallery, including a couple of all night video animations which are pretty incredible (be sure to watch them full screen).  I’ve also created a meteors folder and added a few star trail images.  Below are a few highlights.

This image highlights the locations of all of the cities producing the light pollution along my horizon, most of which is from the Austin, TX metropolitan area.  The stock lens doesn’t quite get full horizon-to-horizon coverage in the north/south direction.


An all-night, all-sky star trail photo!  The camera’s not quite aligned as Polaris is to the left of straight up.

The design, construction, and installation of the two versions of the camera can be found in this gallery.  As mentioned, initially I’d intended to use a stick PC and had planned on a fan cooled housing, but when I decided to go with the USB 2.0 extender, I scaled back those plans.  Unfortunately the ASI290MC runs very hot to the point where it was enough to deform the original PLA base piece I’d mounted it to.  The sealed dome also had a humidity problem causing condensation on the inner surface of the dome that wouldn’t dissipate despite the higher temperature inside the housing.

Initial version installed on PVC mount over roof.

PLA mounting plate deformed by heat of camera.
Condensation in the dome.

This took me back to my original concept for the stick PC solution since I was going to need to ventilate it.  To minimize the chances of water/humidity and dust ingress, the plan was to pull the air through the conduit, which would pull it from inside the wall.  Ideally the air would be cooler and cleaner than the outside air.  Below is the 3D CAD model showing the overall design, with a duct and support for the camera that blows the air up through the middle and circulates it around the camera body, then out past the lens into the dome before it exhausts down the sides past the power supply and USB extender and out the ventilated base.  I also switched to an O-ring instead of a gasket for the dome to housing transition.

 Solidworks CAD model of the finished design.

Cut-away view of the components showing the fan, duct, and circulating camera mount.

Internal view with the outer housing, dome, and camera shroud removed.

Below are all the new printed parts and components and a few pictures of the build-up and test fit.  Follow the links to the gallery page to view the entire step-by-step assembly.

All new parts with for the camera assembly.

The camera mounts into a ducted part that goes on top of the duct column. Spiral vanes circulate the air about the camera and should also help push some of the air through the heatsink slots at the base of the camera.

The camera attaches with a 1/4-20 screw and has to be mounted to allow access to the USB cable connection.  The slots in the duct allow for 22.5 degree adjustment of the camera orientation with fine tuning from the threaded base.   The narrowed duct is to allow the extender and power supply components to be attached around it.

With all the new parts printed and test-fitted, it’s time to do the install.  Again, there are lots more pictures in the gallery.

The vented base screws onto the conduit and the 12V power and a short Ethernet cable jumper feeds out under the fan.

Stacking up all the components and strapping the cables on, the assembly is almost complete.

A second view, now with the camera shroud and diverter installed.

With the housing installed, the camera is finished.  The shell and dome remain together and the thumbscrews hold it on at the base.

I hope you enjoyed seeing this build.  Keep an eye on the galleries for minor adjustments going forward.


Posted in Uncategorized | 2 Comments

Introducing 3D Astrophotography

Today I’m introducing another artistic astrophotography processing gallery.  Through a rather complicated and painstaking process, it’s possible to convert a standard astrophoto into a 3D image. The actual 3D appearance is artificially created, but it still gives an idea of what the object might look like.  The stars are removed from the background nebula (in Photoshop, this is a completely manual process using the spot healing tool to avoid rings around the removed star) and then the new star-less background is subtracted from the original to give the star field itself.  After noise reduction, sharpening, and other post processing steps, the two parts of the image are split into left and right eye images.  Then one of the two images is adjusted, star by star, to move them further apart or closer together.  The goal is to bring the brighter stars to the foreground and varying distances and push things like small galaxies into the background.  A separate trick is used to change the perspective on the nebula itself giving a sense of depth in 3D.  The result is below.

Try crossing your eyes as you stare at the image above from a couple feet away from your monitor.  Eventually you should be able to get it to pop into a 3D view.  Note that you’re not really crossing your eyes, but rather trying to get them to look far away but focus on something close.  You want your left eye centered on the left image and the right one on the right image but focused close up.

I don’t know how often I’ll go through this process, but I plan to post multiple versions of these images for different viewer approaches. The default is just the two side-by-side images that can be used with the “crossed eyes” focus method, or in a Google Cardboard or other stereo viewer. The second will be with the images squashed to a 2:1 aspect ratio which will allow you to view them on a standard 3D TV (e.g. Samsung) in the side-by-side mode. I’ll also post a red/blue anaglyph version that you can view with retro 3D glasses. Finally, an animated GIF will bounce between the two images giving you a feeling for rotation.

I hope you enjoy this latest addition to the site.

Posted in Uncategorized | 2 Comments

Introducing “Astro Art”

You may notice that there’s a new folder in the gallery for what I refer to as “Astro Art.”  About a year ago I had an inspiration for an image of what it might look like to see one of the deep sky objects (DSOs) that I’ve imaged from the surface of a nearby planet or moon.  Drawing from my collection of astro and terrestrial photography, I put together my first Astro Art photo of the Whirlpool galaxy above an airless lunar landscape.  I have other concepts in mind, but just haven’t had time to proceed with them.  However, I decided it was finally time to share what I’d done.  I call this piece “Whirlpool Moon.”

I’m treating this artwork a little differently than all the rest of the images on my website.  While there are plenty of sources for astrophotography, many better than mine (NASA’s Hubble images come to mind!), this Astro Art is my own unique creation and each piece is something you won’t find anywhere else.  Thus, I am not distributing full resolution files, but rather I’m making various high resolution prints available for you to own.  While I haven’t yet decided to limit the number of prints sold (I doubt I’ll ever sell enough to warrant that) I am setting the price at a higher markup to reflect my own effort and the value that I place in these items.  I hope you will appreciate these unique works of art and I hope to provide images that will amaze and inspire you.

Sincerely,

Dr. Michael D. Foegelle

Posted in Uncategorized | Leave a comment

New Print-on-Demand Products

I’ve debated having an option for direct-printing of the various photos on the website here, and while most all of the images can be downloaded full size and printed by individuals, I’ve found an approach that I think will be best.  I’ve sourced a print-on-demand shop that can create posters, mugs, T-shirts, and the like and that will integrate directly into my website shop.  Rather than just printing anything, I will be developing customized artwork for specific products using the best of what I have available. I’ve put a couple of items online starting with a new eclipse poster and a couple of mugs. I’ll be adding more items as I have time to develop artwork I’m pleased with, but requests are welcome.

I’m setting this up to pass through the price and shipping costs from the printer, with only a nominal markup for my artwork, depending on the item. I still have some work to do with the integration to deal with tax issues and the like, since California and North Carolina residents must pay tax because the printer operates in those states. I also recommend that if you want to order any of my other offerings along with your POD products that you split them into two orders. That will ensure the fastest delivery since dedicated POD orders are processed automatically, while mixed orders require intervention.

I hope you find something you like!

Posted in Uncategorized | Leave a comment

It was worth it!!!

While many might question the sanity of driving 850 miles and 13 hours each way for a 2.5 minute event, those who have experienced the totality of a total solar eclipse will generally agree that those who haven’t seen one can’t possibly understand what they’re missing.  The view at totality is phenomenal, and the experience is hard to describe.  Add to that the entire anticipation of watching the Moon crawl across the face of the Sun, the simple joy of solar observing of an active sphere with plenty of sunspots, and the camaraderie of a hundred strangers all enjoying the same event, and you have something not to be missed.

So even though the months spent planning, the many sleepless nights right up to the night before, the gnashing of teeth with both long term and short term forecasts, and constant prayer that the skies would hold up to the event may have been stressful, the end result was well worth the effort.

Posted in Uncategorized | 2 Comments

Greetings from Grand Island, Nebraska!

Got up at 4:15 AM Friday (after a very restless four hours or so of sleep) and got on the road by about 4:50. I’d loaded the bed of the pickup full the night before, but had to stop by the office looking for my home-made camera remote I’d misplaced. Actually had it in my tripod bag. Argh! After 13 hours of driving with short restroom and fast-food stops, we arrived in Grand Island and checked in. Another 30-45 minute drive got us to the Cedar Hills Winery outside Ravenna, where I hosted a star party for the visitors there until around 11:15. Tore down by midnight and back to Grand Island for the evening and finally in bed by 1:00 AM.

So how was YOUR day?

Here’s the contents of the truck bed:


Posted in Uncategorized | 1 Comment

And the Winner Is!

Based on the current weather forecast, I’ve locked my plans down to the Ravenna/Kearney/Grand Island, Nebraska area and have canceled all my other reservations.  The fact that I’ve been asked to host the event at a local winery in Ravenna had something to do with that as well.  Just hope the weather holds!

Posted in Uncategorized | Leave a comment

Planning for 2017 Solar Eclipse

Never look at the sun without eye protection!

If you didn’t already know, in August of this year there will be a total solar eclipse across a swath through the center of the United States from Oregon to South Carolina.  Given the rarity of such an event many people, including yours truly, are planning to make the trip to see the eclipse somewhere along the path.  While others will see a partial eclipse from regions outside the band, only those along the marked path will see the Sun totally blocked by our Moon.

2017 Eclipse PathPath of the 2017 solar eclipse, courtesy of Xavier Jubier’s interactive Google Map.

To that end, I’ve been working on plans to go to a location within the totality region and try to set up for a day of observing and photography throughout the eclipse.  I can’t justify the trip to the West Coast where weather is likely to be the best, so I’ve restricted myself to an arc with a maximum of about a thirteen hour drive from Austin, TX.  However, since the weather and cloud cover are a complete unknown, from this distance it doesn’t make sense to restrict myself to a single location.  On the other hand, hotels and camp sights are rapidly filling or already sold out along the center-line of the eclipse, with some of the regions catching on and offering their few rooms for $400 or more a night.  In order to hedge my bets against the weather and other factors, I’ve made reservations at hotels along that arc from Kearny, NE to just past Lebanon, TN, and will make the final decision on where to go a few days before the eclipse.

2017 Eclipse PlansPotential observing locations highlighted by red dots.

It’s easy to find information on the eclipse with a simple web search, but eclipse2017.org has put together a very good set of resources and links, including viewing locations and an article on why you must see the total eclipse and not just a partial eclipse.  There’s also plenty of good information on viewing and safety, as well as links to buy viewing glasses. Always remember,

Never look at the sun without eye protection!


And if it doesn’t work out for me this time, or if you don’t get a chance to go somewhere to see it, those of us in Central Texas will get another chance in 2024, when we will get a beautiful view of a total solar eclipse across most of the Hill Country, crossing through Fredericksburg, Marble Falls, and on up through Dallas, and catching Austin at the edge of the much wider band of totality.  The Austin Astronomical Society dark sky site at Canyon of the Eagles on the north side of Lake Buchanan is directly under the center-line, while Orion Ranch Observatory will have almost as good of a view with well over four minutes of totality (compared to about 2.5 minutes max for the 2017 eclipse).

2024 Eclipse PathPath of the 2024 solar eclipse, courtesy of Xavier Jubier’s interactive Google Map.

2024 Texas Eclipse Path of 2024 solar eclipse through Texas.

2024 Central Texas TotalityRegion of 2024 solar eclipse totality covering Central Texas cities including about half of Austin.

So happy observing!  I hope you get a chance to see something like this as it’s something you’ll never forget.  And always remember:

Never look at the sun without eye protection!

Posted in Uncategorized | Leave a comment