
In my ongoing quest to fully automate my observatory, I’ve been developing a number of ASCOM standard drivers for most of my custom equipment. The one thing I’ve wanted to do for some time is to find an alternative to Celestron’s NexRemote software that has to be manually started and brought out of hibernation and then manually put into hibernation and shut down before powering off the telescope. Even then, it was common for the NexRemote software to hang up and lose alignment often requiring a good half an hour or more to attempt to re-do an alignment remotely. It never made sense to me that with the availability of plate solving to determine exactly where the telescope OTA was pointing that I couldn’t just enter the current coordinates and have the scope aligned, given a good polar alignment of the mount.
What I needed was a software/driver that would automatically restore the motor position information on startup and automatically stop the drive and save the position information on shutdown. Not to mention, having the ability to take a picture and quickly align the mount to the current RA/DEC coordinates. Given that there was no other alternative forthcoming, I finally decide to go ahead and develop my own solution. Rather than writing another stand-alone program to take the place of NexRemote, which is just an emulator that runs standard hand control firmware, it made more sense just to build all the required functionality from the hand controller into a single telescope interface driver that could be used by any software built to use the ASCOM standard. Thus was born the NexStarEquatorial ASCOM driver.
Essentially I’ve implemented the important components of a NexStar hand controller directly into an ASCOM driver that communicates with the motor controllers directly through the PC or AUX port of the mount. Alternatively, the driver also supports communication through the serial port adapter in the base of the NexStar hand controller, although like NexRemote, it does not actually use the hand controller for anything other than the interface. The driver automatically saves and restores the current position of the mount on exit so that even if the mount is powered down in between sessions, when the driver starts back up, everything’s still where it was.
This driver is targeted towards full system automation and imaging, so it only supports the NexStar mounts in equatorial mode (thus the name). It also relies heavily on imaging software capable of plate solving and aligning automatically (i.e. something like Sequence Generator Pro). With a good polar alignment and starting point, there’s no need to do any sort of manual alignment at all, but it does support manual entry of coordinates from a plate solve to get the current reference if desired. I actually don’t use it because SGP handles that all for me.
By limiting the functionality to equatorial mounted scopes , including German Equatorial Mounts (GEMs) like the CGE, CGEM, CGE Pro, etc., and fork mounted telescopes like the NexStar GPS and CPC mounted on polar wedges, the requirements for the driver are greatly simplified. For a mount that’s perfectly polar aligned, the “azimuth” axis becomes the right ascension (RA) axis and simply needs to run as a clock motor, with one revolution every 24 hours. The other axis (altitude/elevation for a fork mount) just provides the North/South declination adjustment. The spherical coordinate system for an equatorial mounted scope is pretty straightforward then, with the current local sidereal time indicating what should be directly overhead along the meridian line dividing the eastern and western halves of the sky. The azimuth angle relative to the meridian just needs to be converted from 360 degrees to a 24 hour format and offset by that sidereal time to get the current right ascension, although for GEM mounts that also requires an east/west offset of 90 degrees between the axis position and the orientation of the OTA. The declination axis runs ±90° from the equator, but again for a GEM there’s a positive and negative side to the OTA orientation depending on which side of the pier the OTA is on and which side of the sky it points to. And of course in the southern hemisphere, the scope is mounted in the opposite direction and all axes have to run backwards. In all it’s just a pretty basic spherical geometry problem, but getting all the signs and combinations of behavior correct was still a bit tricky. Some of the Celestron mounts have their own quirks as well, with the CGE Pro (and possibly others) forcing a required 90 degree offset to the definition of “up” on the azimuth axis. And of course the ASCOM standard has its own quirks.
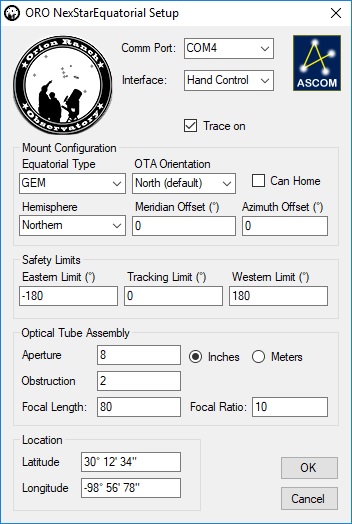
The following figure is the current setup dialog for configuring the driver. It sets up the communication method and mount type, as well as the mount location which is critical to the initial determination of the RA/DEC coordinate system. Subsequent homing and alignment/synchronization steps will set the actual position offsets once connected to the scope. In addition, ASCOM reports the details on the optical tube assembly, so that information can be entered here as well. Hovering over each control provides hints as to the function of each setting.
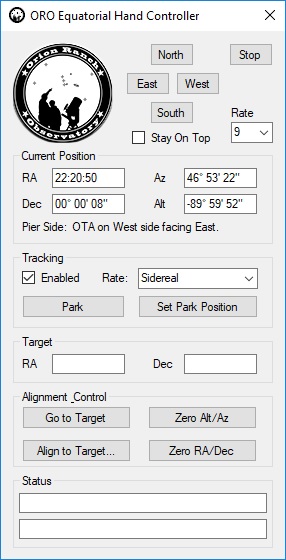
Once the ASCOM compliant client software connects to the scope through the driver, the following hand control paddle is displayed. The hand controller can be toggled to stay on top or closed and reopened from ORO logo icon in the system tray. The hand control provides traditional manual positioning control, targeting, position readout, tracking and parking control, as well as basic alignment functions. No positioning database is provided as that is expected to come from the client software. Other than an initial homing process to set the reference position of the mount the first time the driver is used, no further manual interaction should be required given suitable client software.
The driver has been made available for beta testing by interested users, and I’ve started this thread on Cloudy Nights for comments and feedback. I may eventually publish a more detailed manual here in the future, and of course expect to probably add a few more features over time as I have time and the desire to do so. I hope others will find this as useful as I have so far. It solves my automation problem amazingly well!


6 Responses to NexStarEquatorial Driver Released for Testing